Showing posts with label How to make a.... Show all posts

Wednesday, April 3, 2013

Toothpaste - It's Not Just For Teeth Anymore!

Do you use toothpaste?
I mean really use it?
 
Yes I see you have shiny white teeth, but come on!
We can make it do so much more!
 
Let's take a look...
Sorry about the blur
 
So if you're a mother and if your kids have ever gotten into the markers then you're going to need this one.
My youngest is one of those kinda kids and his brothers are his suppliers.
They leave markers out that just lay there, begging to be used in the naughtiest of ways.
 
On one two three such days he decided to add some decoration to my living room coffee table.
Now luckily this coffee table is very rough and rustic, so they weren't glaringly obvious.
 
Anyway, after staring at them day after day, I remembered...
TOOTHPASTE.
So I went and brushed my teeth.
When I came back I rubbed some onto the marker spots...
Let it marinate...


AND VIOLA!
Okay, so they aren't gone all the way.
In real life though you don't even see them unless you know where to look.
Plus, as I mentioned, this table is very rustic so... ya know.
I could have most likely done it again and gotten them all the way out, but I was happy already.
I will mention that it kinda dries out the finish of your wood.
I simply applied some olive oil to remedy that.


Now here's another pretty cool one.
Once again, if you have kids then you have scratched DVD's and CD's.
I had many of them.
I did this with CD's that would skip and stall.
VIOLA!
No skipping.
No stalling.
I did this with DVD's that would freeze up due to scratches.
VIOLA!
No freezing.
 
Okay, so this is a miracle worker but it's not a magic wand.
If you've got scratches that you can stick your fingernail in then probably not going to work for ya.
Sorry.
Now I got this handy little tip from this lovely lady's blog.
(via Pinterest)
Now she suggests using Kids CREST toothpaste.
I had no Crest, but I did have Kids Colegate.
Worked great!
As she mentions, you may have to do it more than once on some of them.
Check out her post because she gives you the step-by-step that I am obviously not doing for you.
 
Have anymore toothpaste miracles?
Do share...


Photobucket

Thursday, March 28, 2013

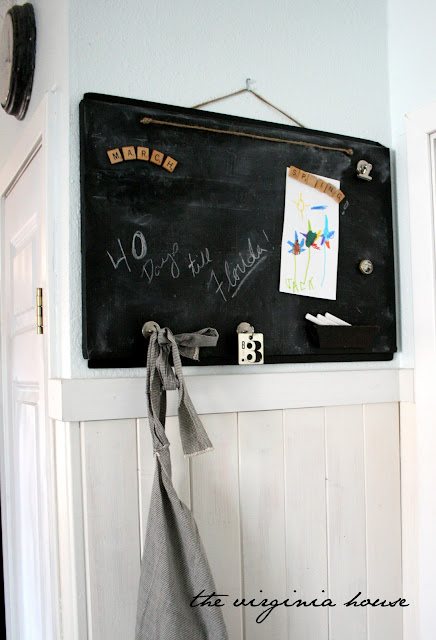
DIY Magnetic Chalkboard

This project falls into the "Could be Cheesy" category.
Lets be honest with each other though...
Some of us blogger people sometimes do cheesy projects.
Can I get an Amen?
 

Okay, so let me preface this all by saying, I hate stuff hanging on my fridge.
I have stuff hanging (on the sides) of my fridge.
AndIHateIt
 
I love my kids sweet (if many) little drawings they make me though.
I like for them to see them hanging proudly.
Then there's that dentist appointment card reminder thingy.
The count down till vacation.
And so on and so forth.
These things need there own places in the circle of life.
 

So I actually didn't use a cookie sheet cause I already had this sheet of metal stuff that a friend of mine gave me.
She thought I could use it for something.
She was right.
I like the kind of friends that gift me with random sheet metal.
 
So I took my gifted metal and I:
Took a hammer and nail and punched two holes in the top for my twine to go through.
I then decided that there had to be an easier way to punch holes that didn't involve my ears bleeding.
Enter the Dremel Tool.
I used it to drill my other two holes for the upside down wood desk pull.
Now you could stay primitive and stick with the hammer and nail.
But.
If you have the dremel, use the dremel.
You could also just glue the handle to the metal.
I guess.
 
 
I would strongly suggest using the Spray Chalk Paint because it will adhere to the metal much better than brushing it on.
After it dries then thread your twine in.
Screw your handle (pull) on.
Plop on your magnetics.
 
Now wait for your life to be transformed and automatically organized.
 
Or not.


I (and "I" use "I" loosely since it was actually the husband) picked up the magnetic hooks at the Wal-Mart.
You don't have to go the magnetic route if you don't want.
Dremel some more holes.
Go for real hooks.
 
If you want.


By the way...
I am going to Florida.
But it's not in 40 days.
I'm excited.


Photobucket

Visit thecsiproject.com


Friday, March 22, 2013

Chair Renew- Fabric Painting

Don't drop your teeth.
Yes it's me.
Posting more than once in a weeks time.
Miracles (and sick kids) do happen.
 
You may remember about a year ago I picked up this little number from a local junk shop.
You can see the post about it here.
.
 
I did a semi-good job of disguising how dirty the fabric really was on the chair, despite my best scrubbing.
I had plans to paint the fabric, but I am anything but fast!
I've lost to the snail on many an occasion.
 
 
So yesterday I had three sick kids at home and needed something that was easy to do, not much mess and I could be right there with them.
Enter...
the chair.
 
Now let me make a few notes here if you plan on doing this kind of little redo.
 
1. Make sure you have a chair that has the kind of history where the only way to go is up.
2. Make sure you're not looking for perfection. (what's that?)
3. Make sure you don't want fuzzy soft fabric when you're done.
4. Make sure you're sure.
 
This is a simple easy peezy project that I didn't even take "how-to" pictures of.
You just need:
A spray bottle with water in it.
Acrylic paint (I mixed my own colors)
Water.
Paint brush.
Rag to keep things un-drippy.
And this:
 
Do I know if you could do it without Anita's Textile Medium?
No I do not.
I've only done this once and since I already had the medium then I thought I would throw it in.
You can throw it out and see what happens since you only spent pennies on the dirty chair that you're getting ready to paint too.
Right?

So I mixed up some paint, some medium and a fair amount of water.
I shook it.
Watched my arm flap.
Thought about working out.
Decide shaking the jar was a pretty good work out.
 
I sprayed the fabric till it was damp to the touch.
Dipped my brush in my concoction and gently applied,
I say gently cause I mean gently.
Don't go slopping it on like chili on a hot dog.
Use some grace.
Some finesse.
 
Do that all over and let it dry some.
Do it again if you see some spots you missed.
I did it about 3 times.
Making sure my fabric was damp each time.
 
 
You can see on the front of the chair that I should have gone back and done it a little more.
It actually doesn't show as much in real life though.
 
So the variations in fabric color and all that was actually like that before.
It is a velvet kind of material (a good one to paint).
So it changes when stroked in different directions.

 
It isn't hard or poky.
Just not soft and velvety either.
 
It isn't perfect.
Just perfect for me.
The snail.
With floppy arms....
 
I'm going to go work out now.


Photobucket

Wednesday, December 5, 2012

Making it Chippy

This is not a project for the perfectionist.
Not even for the semi perfectionist.
This is for the sloppy Sam, haphazard Holly and messy Molly.
If that's your name then come forth.
The sad part is that there was a miscommunication between me and the Husband and my good "after" photos of this project were deleted.
It was my miscommunication though so I can't cry too hard:-(
Let's start where all good things should start...
At the beginning.
With some bad photos preferably.
When will I ever learn...
 
 
This shelf was made by the husband of a customer.
Her inspiration was the shelf from Pottery Barn and he uh, nailed it.
Sorry, bad pun.
 
 
So anyway, he built it a little larger than pb's, but otherwise a very close imitation.
They gave it to me raw wood.
I got to work painting it.. Burgundy?
These things are trial and error I tell you.
 
 
After mixing up another color then I swiped it on.
Slap happy comes to mind.
I swiped it on in a slap happy way.
I'm telling you, this project just works better with that method.
Okay, so if you look closely at the photo above you can see streaks and white-ish specks.
See it?
That is where I took a regular ol' candle and rubbed this puppy down.
I rubbed it all over, but especially on the edges and on the bottom section.
Next up was another sloppy painting job.
This time with white.
A heavy coat!
Got it?
Continue on then.
 
Now this is where I kinda didn't take a picture.
It's not that I forgot, it's just that it's kinda hard to get a photo of it.
After the white paint had dried then I took a heat gun and bubbled up the paint.
 
*Heat guns can burn you or the wood so use caution when operating
I had to offer that word of caution.
It was the careful thing to do.
 
So now that we have strategically bubbled, we start to scrape.
(bubble much where you want to scrape much)
Now you don't have to be married to a scraper here.
You can also use a pampered chef pan cleaner.
One of those green pot scrubber thingies.
Other "things" you find laying around.
There are no rules!
If it makes a good, authentic mark, then use it!

Next up, I took some glaze to give it the "smokey" aged look.
After that I rubbed clear wax on it.
Then brown wax.
I always rub clear on first since if you just go at with your dark wax then you lose some control of the look.
 
So at the end of the day, you should have something that resembles this.
Or not.
I told you perfectionists not to try this!
 
 
The customer was kind enough to send me a photo of it hanging comfortably above her bed.
 
 
Go for it!
Send me a photo or a link if you try it out:-)
 
By the way, congratulations to the lucky winner of my 1000 Followers Celebration!
Clydia over at Mango Seed Marketplace won!
Clydia is an enormously talented lady when it comes to painting signs, so be sure to check out what she's done!
Thank you to all who entered!
 
 
Photobucket

Monday, September 24, 2012

NO SEW! Front Door Decor

I'm sad to say that I procrastinated about doing this forever.
I try to avoid getting my sewing machine out.
Because of that I have avoided doing this project for a few months.
I finally decided that instead of avoiding then why not just do it "no sew"!
Yay.
 
Let's get right to it then.
 
You will need:
1. Fabric
2. Freezer Paper
3. A dowel rod
4. Paint
5. Hot glue
6. Twine or Ribbon

 
I did a simple design on my computer and printed it out.
(I use this program to design everything)
Then I lay my freezer paper over it and traced it with a pencil.
Use a razor or exacto knife to cut your stencil.
Remember that you are using the inside of the stencil and not the pieces you cut out so be very careful as you cut!
 
 
Ignore the stained rug and the toes peeking out and move forward...
 
Cut out your burlap and iron smooth.
 
 
Fold over your edges and iron them, then hot glue them down.
 
 
Center your freezer paper stencil on the burlap and iron on good.
Make sure you get all the tiny, pointy pieces ironed in the correct positions.
 
 
Blot on your paint.
Try not to brush it on since this may result in pushing paint under the edges of the stencil.
 
 
Wrap the burlap (or whatever fabric you chose) around your dowel rod.
Yes, I stained my dowel rod.
I'm fancy like that.
Glue the bajeebers out of it.
 
Go ahead and wrap some twine or ribbon around the dowel rod now.
Good job.
 
You should have something like this now...


I'm not a Fall person.
I'm strictly a Spring & Summer person.
I'm trying to embrace it though.
 This is me.
Embracing it.
Yay.
Photobucket

Wednesday, June 13, 2012

Easy Rustic "Subway" Art

I'm not sure that I would necessarily classify this as Subway Art, but you get the idea.
And for those of you who want to make your own art but need a shortcut...
...here's your answer
the white ones are ones that I "made" out of other letters that I was not using
 since there wasn't enough of each letter that I needed.

I made the mistake of getting letters that were NOT precut.
It took me hours to cut them out but I was determined to do this project for pennies.
(they are vinyl letters that you would put on your mailbox, but make sure you buy letters that are cut out and not blocks)
Next up lay them out on your prepared board(s).
I used some that I had laying around and just stained them.
Figure out how they will fit.
Once I figured out my layout then I took a level and drew lines to make everything nice and even.
I then stuck my letters on, using my lines as guides.

sorry about the blurry photo

I taped off the sides because I wanted them to remain stained and not painted.


I then took my paintbrush and started blotting the paint on.
I tried not to brush at all so that I wouldn't get any paint under the edges of my letters.


This was the part that Jack called "magic".
I carefully peeled each letter off...


It didn't turn out perfect.
That's okay.
The reminder that it brings is worth each crooked line and letter.
Photobucket

Friday, November 4, 2011

Baby Clothes Sources

Remember when I showed you these baby gifts?


1. Boys shoes.
I got the pattern here.

This was the easiest pattern and best guides and instructions.
Trust me I know.
I made 6 pairs of shoes and only two pairs made the cut.

I did add an extra "buckle"  cause I wasn't crazy about how they look plain.
I have plans of making more for Lee.
Want to try and modify it into these...

I'll let you know if that happens:-)


2. White Linen Kimono Shirt.

Heh-heh.
This was made using this as inspiration.
Umm, the pattern was no help to me and it took like 38 pieces of paper to print it.
I scrapped the pattern and just winged it.
I used a pair of pants that were on clearance at Target to make it.


3. Girl Shoes

These are actually not that hard.
I got it right better on the second pair I made.


You can find the pattern here.

They were also made with the pants from Target.
*Tip* If you plan on making these then try to pick very light, thin material.
They don't do so well with bulk.

4. Freezer Paper Onesie/Applique Onesie

These were born from the inspirations I found on Pinterest.
Not actually onesies, but blankets, pillows and such.

Awesome tutorial on freezer paper right here.

Hope that helps!!
It was great fun and I found lots more ideas to try out someday too!


Photobucket